Authenticating with the Patron API
The following tutorial describes how to use the Sierra API authorization endpoint to authenticate with a Sierra server.
In addition to bibliographic and item data access, the Sierra API provides transactional APIs for placing holds and updating patron accounts. It incorporates two independent options that affect access to patron data: Global Patron Access and Patron-specific Authentication. When library staff generate API keys in the Sierra Administration Application, they choose which patron record access permissions to apply to each new key.
| API KEY GENERATION OPTIONS | |||
|
Patron Read + Patron Write |
Patron-specific Authentication | Patron Record Access | OAuth 2.0 Flow |
| No access to patron data | Client Credentials Grant | ||
| x | Read and update any patron record using the API. | Client Credentials Grant | |
| x | Read and update only specific patron records using the API. Patrons must authenticate using their credentials, such as barcode or PIN. | Authorization Code Grant | |
| x | x | Read and update any patron record or specific patron records using the API. Patrons can be authenticated using their credentials, such as barcode or PIN. | Client Credentials Grant and Authorization Code Grant |
Libraries generate and issue API keys with the level of patron record access appropriate to the use case of the intended application. The API’s OAuth 2.0 Client Credentials Grant and/or Authorization Code Grant flows support the available access levels.
An application using the API must authenticate itself with the Sierra system before it receives access to any of the API endpoints. The following steps show you how to authenticate your application using the Client Credentials Grant. You can download the Advanced REST Client Chrome plug-in, or a similar REST client, to try it for yourself.
The API key and secret listed below are not valid credentials and are used as examples only. To obtain your own API key and secret for sandbox.iii.com, open a ticket with customer support. If you are a vendor working with a library customer, you can request access by sending an email to vendorsupport@iii.com.
- Obtain an API key and secret. This example uses an API key issued for Innovative's sandbox at https://sandbox.iii.com:
Key: WO0rS+IFzwLnso/kmPGM6S9h5Lv8 Secret: pleaseletmein
- Combine the API key and secret into a single string separated by a colon:
WO0rS+IFzwLnso/kmPGM6S9h5Lv8:pleaseletmein
- Convert the combined key:secret string into a Base64 string. Software libraries that do this conversion are available in most programming languages. Since this example uses the Advanced REST Client to make calls to the API, we'll use the Base64 Encode and Decode online utility.

The original key:secret string
WO0rS+IFzwLnso/kmPGM6S9h5Lv8:pleaseletmein
becomes
V08wclMrSUZ6d0xuc28va21QR002UzloNUx2ODpwbGVhc2VsZXRtZWlu
after it has been Base64 encoded. This encoded string serves as our credentials when we authenticate with the Sierra API.
- Launch the Advanced REST Client. If you do not have the REST client installed, download and install the Advanced REST Client Chrome plug-in, or a similar REST client.
- Set the URL in the Request URL field to:
https://sandbox.iii.com/iii/sierra-api/v6/token
- Set the method to POST.
- Set the Header name field to authorization.
- Set the Header value field to Basic, and insert the Base64-encoded credentials from
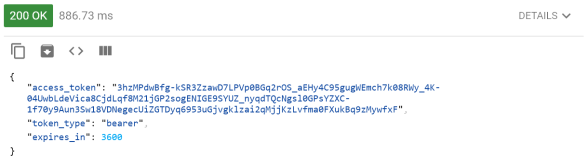
step 3. As an example, the Header value field will appear as: - Click the Send button on the upper right of the GUI. When the authentication is successful, the API returns a status of 200 and an access token is provided in the response body. This access token is used to make subsequent calls to the API for access to Sierra data.
Basic V08wclMrSUZ6d0xuc28va21QR002UzloNUx2ODpwbGVhc2VsZXRtZWlu
In the next tutorial, we’ll use the access token to make an API call.